Altiro – User Guide

Altiro is the fastest and lightest IFC viewer in Chile – free, no sign-up, no installation, and 100% private: your files never leave your browser. This guide walks through every window and every button.
FreeWebAnyManagement
Product screenshot coming soon

1. Getting started

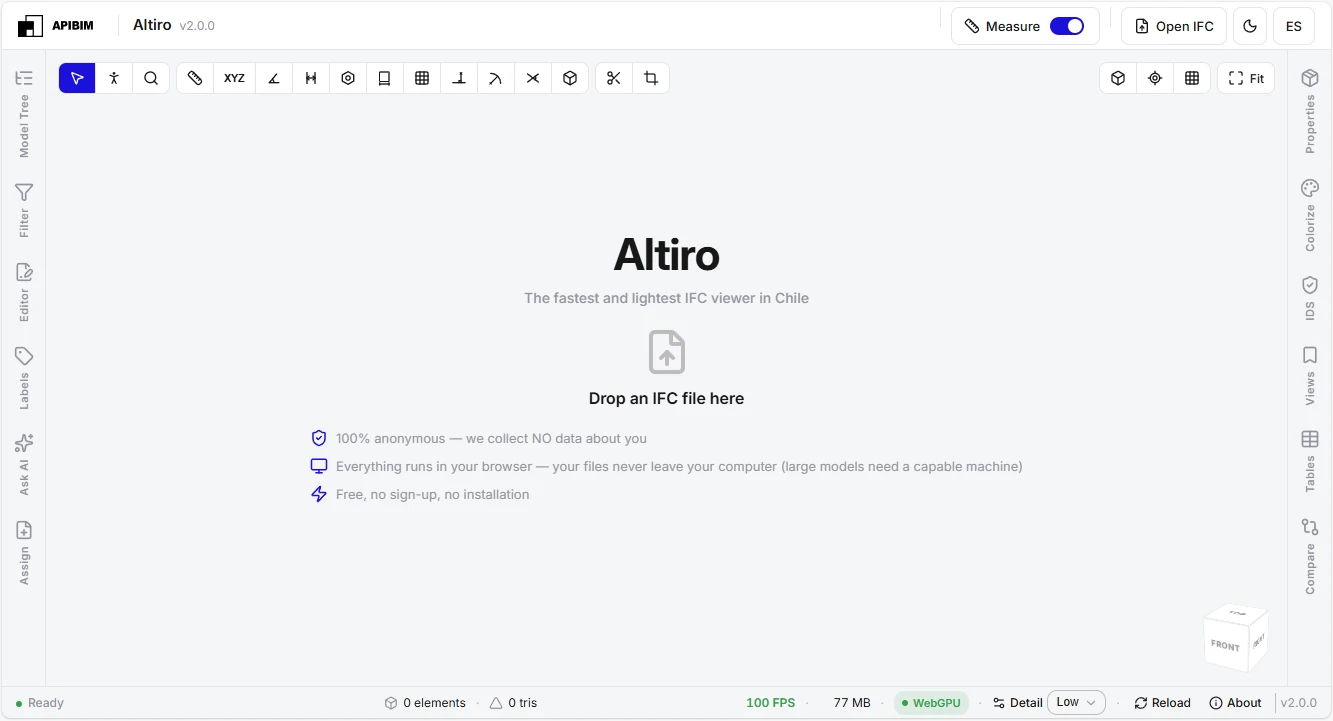
Altiro opens IFC models (IFC2x3 and IFC4) straight in your browser – no plugin and no upload to a server. Drag a file onto the window or use Open IFC to begin. Around the 3D view sits a set of dockable windows you open from the left and right edges.
intro.webp
Supported files
IFC 2x3 and IFC4 (.ifc). You can also export the scene to IFC or GLB.
100% private
No account, no tracking. Parsing and rendering run locally; your model never leaves your computer.
Best on a modern browser
Use an up-to-date Chrome or Edge. Very large models need a capable computer.
Measure toggle
Leave Measure off for the fastest open; turn it on when you need to measure or rotate precisely (it builds a spatial index). Your choice is remembered.
Back to contents

2. Opening & combining models

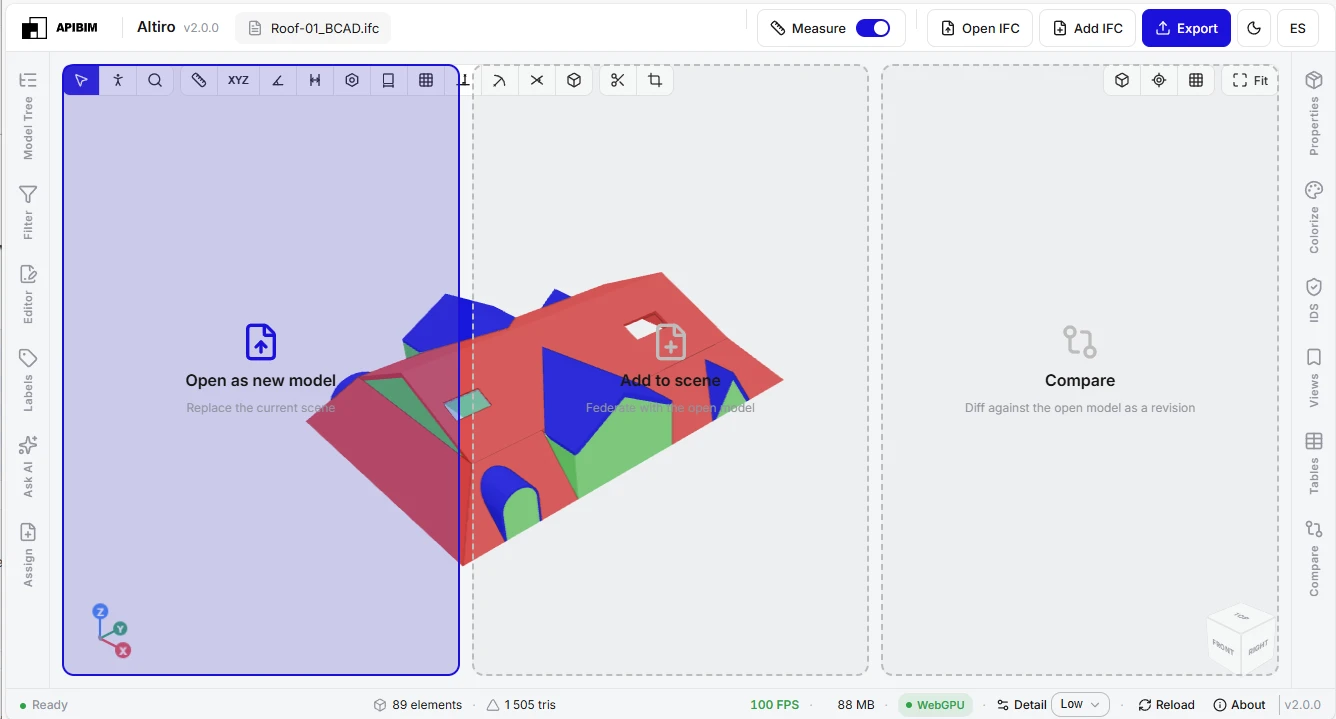
Drop an IFC anywhere on the window, or use the top bar. You can load several files at once – Altiro federates them into a single scene.
open.webp
Open IFC
Pick a file; it replaces the current scene.
Add IFC
Append another model to the scene (federation), keeping what is already open.
Drag & drop
“Open as new model” replaces the scene; “Add to scene” federates with the open model.
Reload
Discard all edits and reopen the original file.
Loading stages
A progress bar reports parsing, spatial hierarchy, tessellation and GPU upload.
Back to contents

3. Moving around the 3D view

Orbit, pan and zoom with the mouse, walk through the model in first person, and reorient with the view-orientation cube.

viewport.webp
Orbit / Pan / Zoom
Drag to orbit, Shift+drag to pan, mouse wheel to zoom.
Select
Click an element to select it – it opens in the Properties panel.
Fit / Zoom to selection
Frame the whole model, or just the current selection.
Walk mode
WASD or arrows to move, Q/E down/up, Shift to sprint, right-drag to look. Needs perspective view.
Orthographic / Perspective
Toggle parallel vs perspective projection.
View cube
Click a face (Front, Back, Top…) to snap the camera to that orientation.
Base point
Mark the model’s IFC (0,0,0) origin.
Structural grids
Pick which grid lines to display.
Back to contents

4. Walk mode

Walk through the model in first person – handy for checking clearances and reading spaces at eye level. Turn it on from the viewport toolbar; it needs the perspective view.

Enter walk mode
Toggle walk from the viewport toolbar – the camera drops to a first-person view.
Move
W A S D or the arrow keys move you forwards, back and sideways.
Up / Down
Q lowers you, E raises you.
Sprint
Hold Shift to move faster.
Look around
Right-drag to turn the camera.
On touch
A joystick moves you; drag anywhere to look around.
Movement speed
A slider sets how fast you travel.
Needs perspective
Walk is disabled in orthographic view – switch to perspective to use it.
Back to contents

5. The top bar

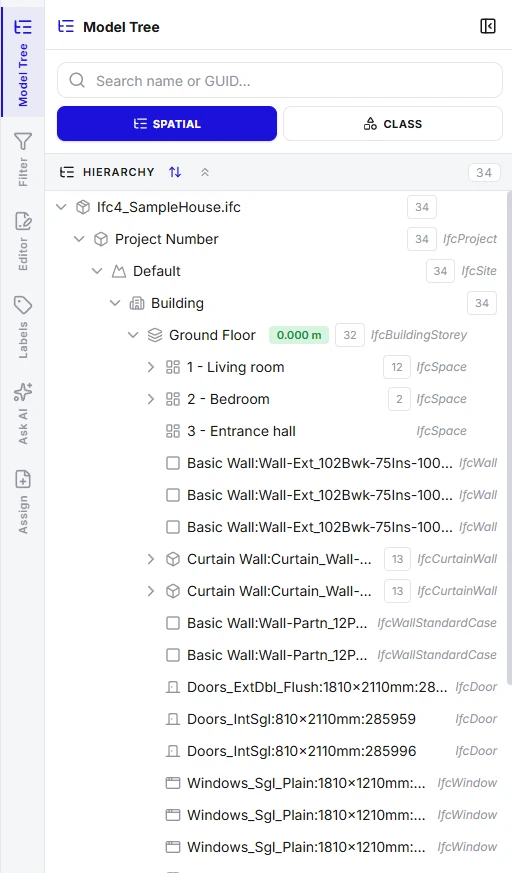
The header holds the file actions and the global toggles. On phones it collapses into a menu – see “On phones & tablets”.

topbar.webp
Open IFC / Add IFC
Load a model, or federate another one into the scene.
Undo / Redo
Step back and forward through your model edits.
Export
Save the scene as IFC or GLB – opens the Export window.
Measure
Master switch for the measuring tools and precise rotation.
Theme
Switch between light and dark.
Language
Switch between English and Spanish.
Back to contents

6. Model tree (left panel)

tree.webp

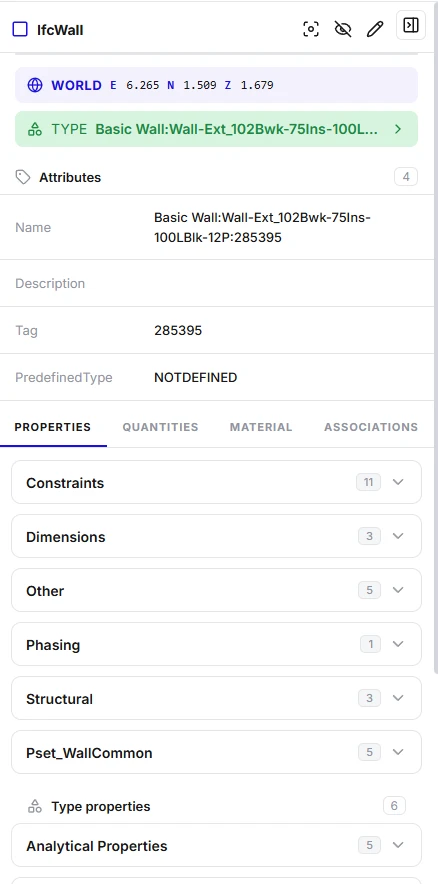
Browse the model by spatial structure, by IFC class, or by assembly hierarchy. Search, sort, isolate and hide from here.
SPATIAL / CLASS / HIERARCHY
Three ways to group the tree – by storey, by IFC type, or by assembly.
Search
Find by name or GUID; matches inside collapsed storeys are revealed automatically.
Sort
Default, Name, Tag or IFC type, ascending or descending.
Collapse to floor
Fold the whole tree back to storey level – the double-up-arrow button.
Isolate
Show only this level in 3D; Ctrl+click to combine several. Clear isolation restores everything.
Sticky rows
The ancestor path stays pinned as you scroll – click to jump, or use the chevron to collapse that level.
Per-model eye
Hide or show a whole federated model.
Remove model
Take a model out of the scene.
Annotations
Show or hide 2D drafting and dimensions.
Back to contents

7. Properties (right panel)

properties.webp

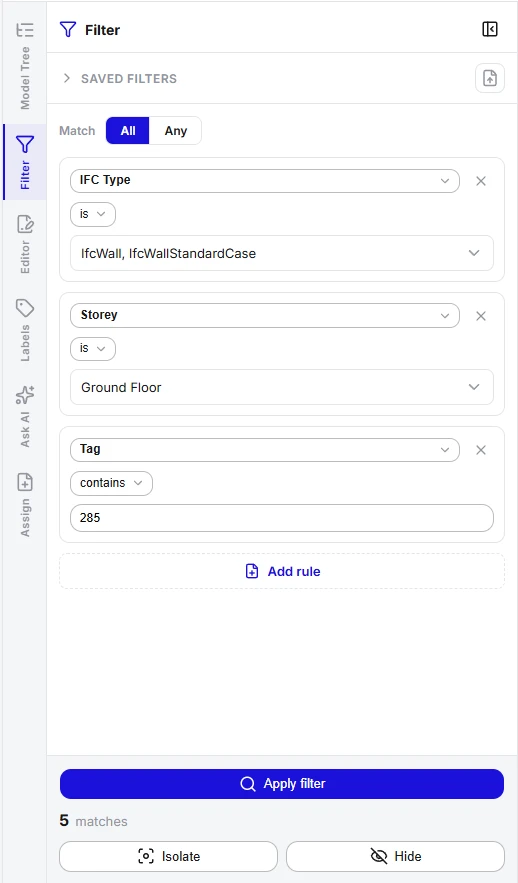
With an element selected, the right panel shows its attributes, property sets, quantities, material and bSDD classifications – plus, for an instance of a type, the type’s own properties. It is also where you edit, retype and restructure elements. With nothing selected it shows the file information.
Attributes / Properties / Quantities / Material / bSDD
The element’s data, grouped by tab.
Instance vs Type properties
See the occurrence’s own values and the shared type’s values.
IFC Class (retype)
Reassign the element’s IFC class; geometry and relationships are kept, attributes re-map on export.
Edit properties
Change values inline; “Edit all selected” edits a whole multi-selection at once.
Copy GUID
Copy the element’s GlobalId.
Hide / Isolate / Delete
Visibility and removal for the selection.
Combine / Move up / Explode / Bake
Build or flatten assemblies – reversible until export.
Assign material
Set or swap the material (shared across every element that uses it).
File information
With no selection: file size, parse time, length unit, project and authoring data, and Model Transform to shift or rotate the whole file.
Back to contents

8. Filter

filter.webp

Build rules that select elements by attribute, property, quantity or bounding-box size, then isolate or hide the matches. Save rule sets for reuse.

Match All / Any
Every rule must match, or any single one.
Add rule
Pick a property or quantity – or a Length / Width / Height / Largest-side box dimension – and a value.
Isolate / Hide
Show only the matches, or hide them from the scene.
Saved filters
Save the current rules, then load, delete, import or export them.
Back to contents

9. Colorize

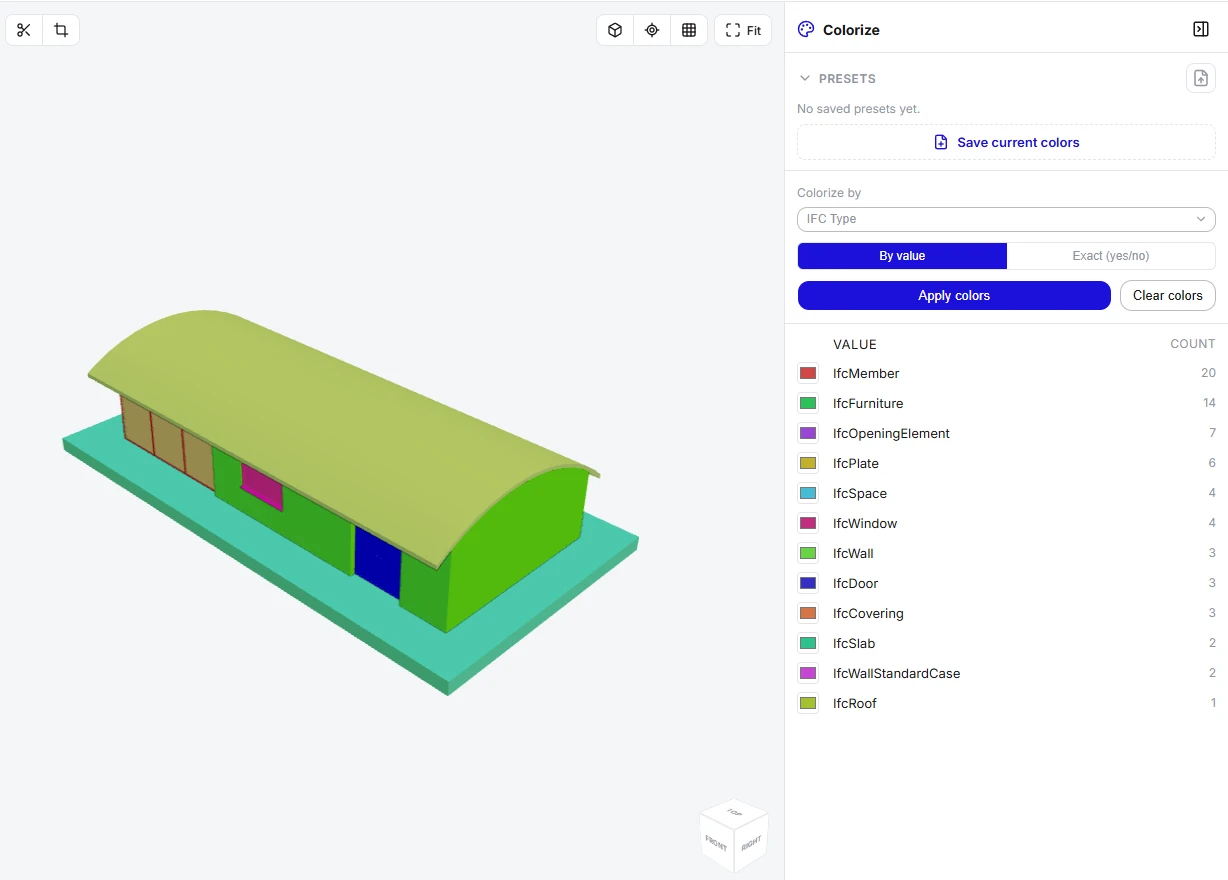
Colour the 3D model by any attribute – IFC type, name, storey, a property or material – to read it at a glance. Two modes: a colour per value, or an exact yes/no match.
color.webp
Colorize by
IFC Type, Name, Storey, Property or Material.
Mode
By value (a colour per distinct value) or Exact (match one value yes/no).
Property set / Property
When colouring by a property, choose the set and the property.
Apply / Clear colors
Paint the model, or remove the colouring.
Presets
Save a colour scheme, then apply, delete, import or export it.
Back to contents

10. Labels

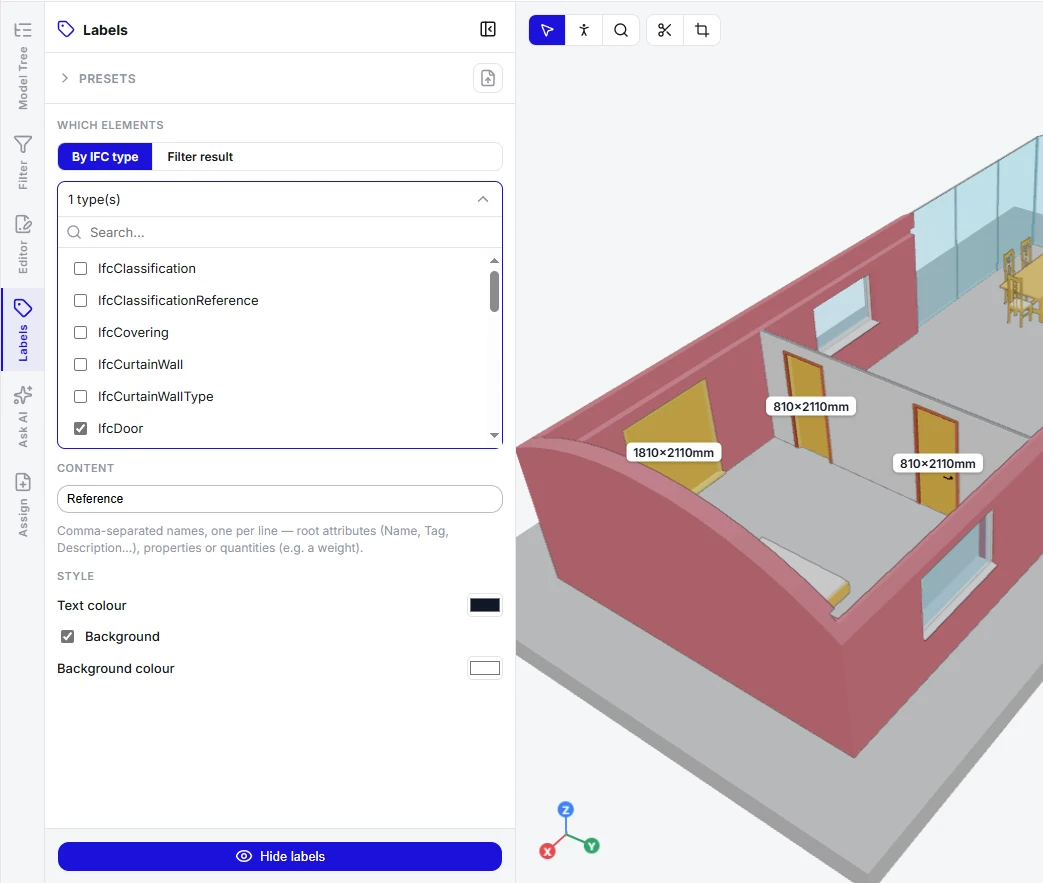
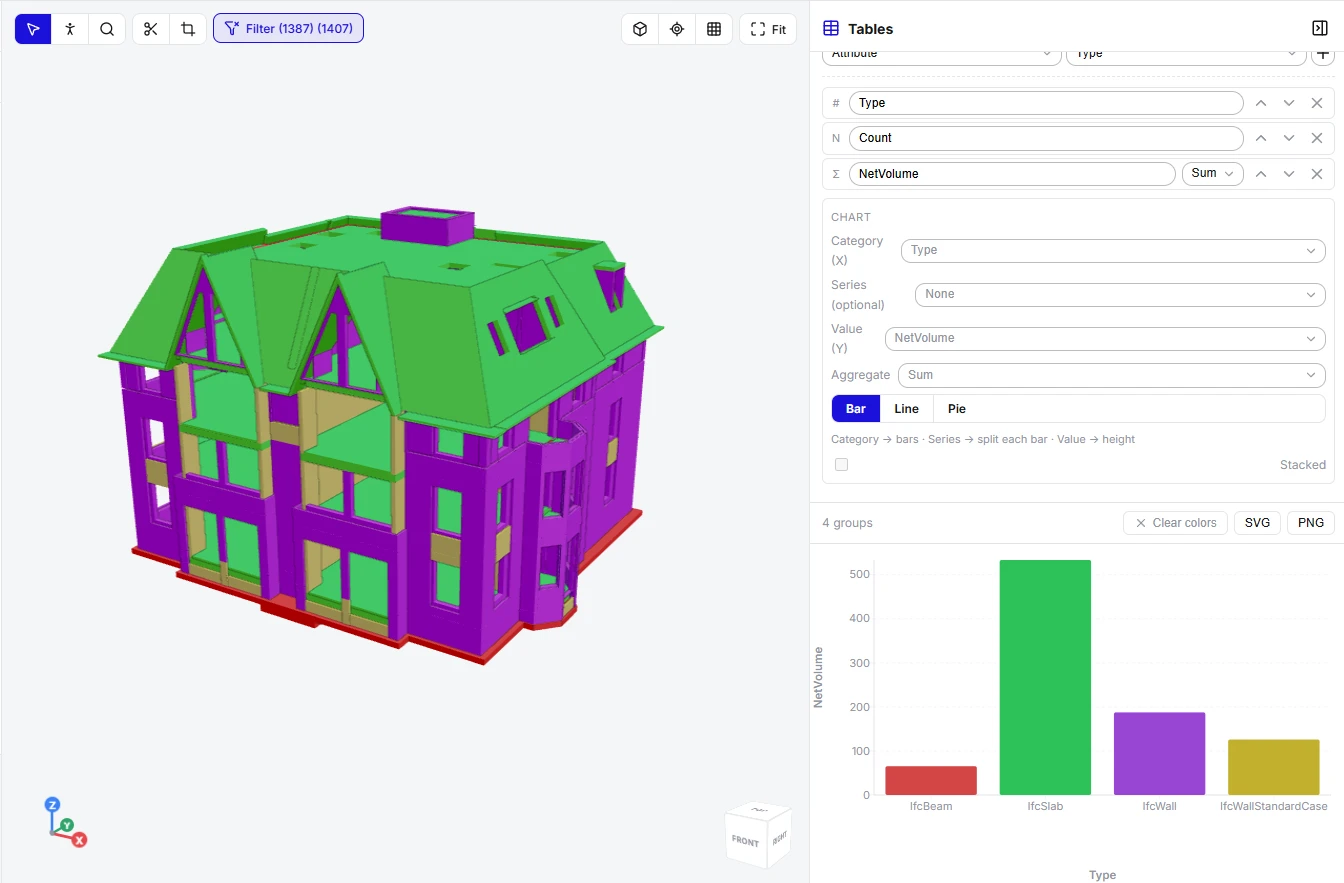
Float text tags over elements – a name, tag, a weight, or any property – for the whole model or just the current filter result.
labels.webp
Show labels
Turn the label overlay on or off.
Which elements
By IFC type (pick the types) or the active filter result.
Content
The attributes, properties or quantities to show – comma-separated, one per line.
Style
Text colour, and background on/off with its colour.
Presets
Save filter + labels together, then apply, delete, import or export.
Back to contents

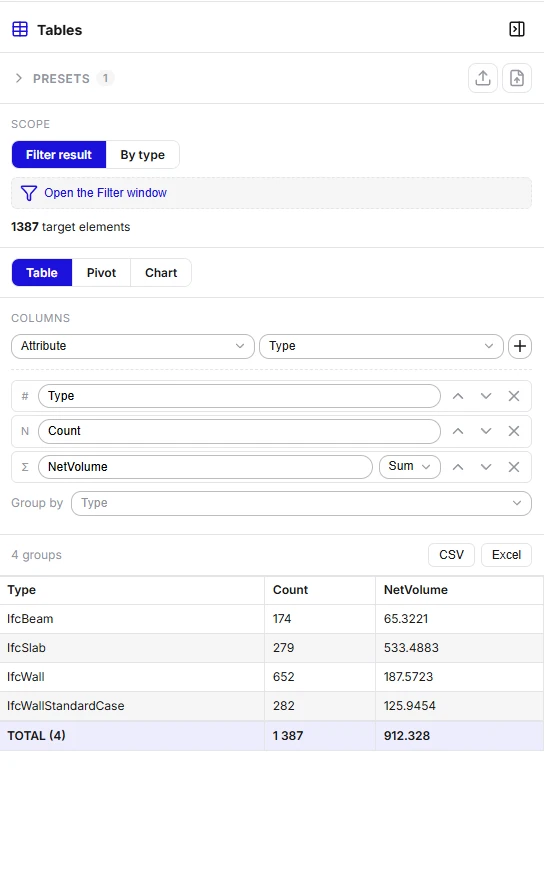
11. Tables & charts

tables2.webp
tables1.webp

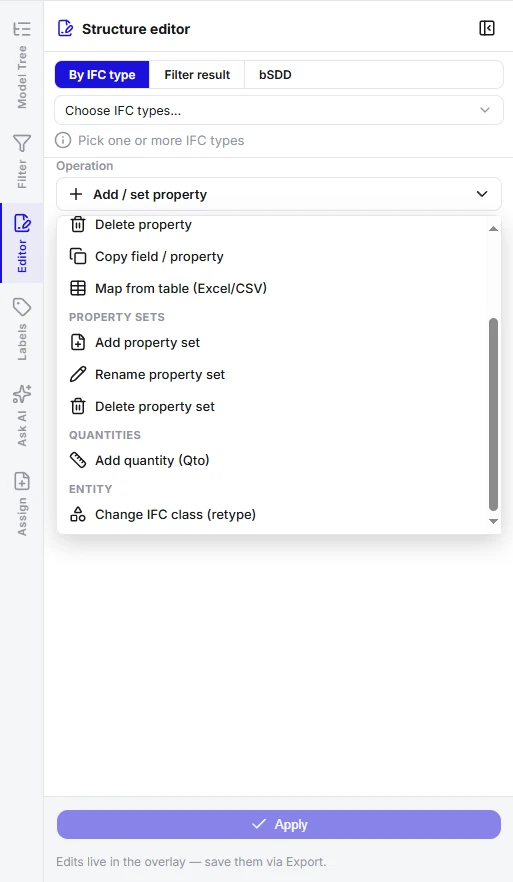
Turn the model into a table, a pivot or a chart. Columns can be attributes, properties, quantities or a count; group and aggregate; then colour the 3D model by the result or export it.
Scope
The current filter result, or a set of IFC types.
Columns
Add attribute, property, quantity or count columns; reorder or remove them.
Group by
Collapse rows into groups.
Table / Pivot / Chart
Three views of the same data; pivots have rows, columns, value and an aggregate.
Chart
Bar, Line or Pie; a category, an optional series and a value; with a stacked option.
Colorize 3D
Paint the model by the chart’s groups; Clear colors removes it.
Export
CSV, Excel, SVG or PNG; save, import and export table presets.
Back to contents

12. Structure editor (bulk edits)

structure.webp

Apply one edit to many elements at once – add or change properties and quantities, rename, retype, copy fields, or map values from an Excel/CSV table. Edits live in an overlay and are written on Export.
Scope
A set of IFC types, the filter result, or a bSDD selection.
Add
Add or set a property or quantity, add a whole property set, or copy a value from another field.
Delete
Remove a single property or an entire property set.
Rename
Rename a property or property set, change a value's type, or change an element's IFC class (retype).
Map from table
Match rows by Tag, Name or GUID and write columns into properties.
bSDD standard sets
Add a whole buildingSMART set – or a single property – to every element of the type.
Back to contents

13. Documents & approvals

associate.webp

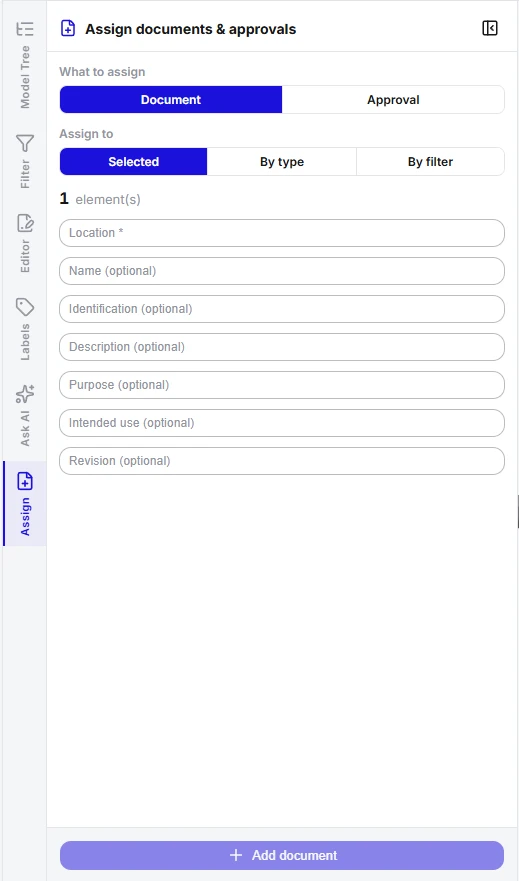
Attach documents (drawings, specs) and approvals to elements – one at a time from the Properties panel, or to many at once from the Assign tab. Everything is written into the IFC on export.

What to assign
Choose a Document or an Approval.
Assign to
The selected elements, a whole IFC type, or the current filter result.
Document fields
Location (link or path), Name, Identification, Purpose, Intended use, Revision, Confidentiality.
Approval fields
Status, Level, Qualifier and the approval date.
Add & assign
Fill the fields, then assign to the whole target set at once.
Per element
Each element's Associations tab in Properties lists its documents and approvals – edit or remove them there.
Applies on export
Assignments live in the overlay and are written into the IFC on Export.
Back to contents

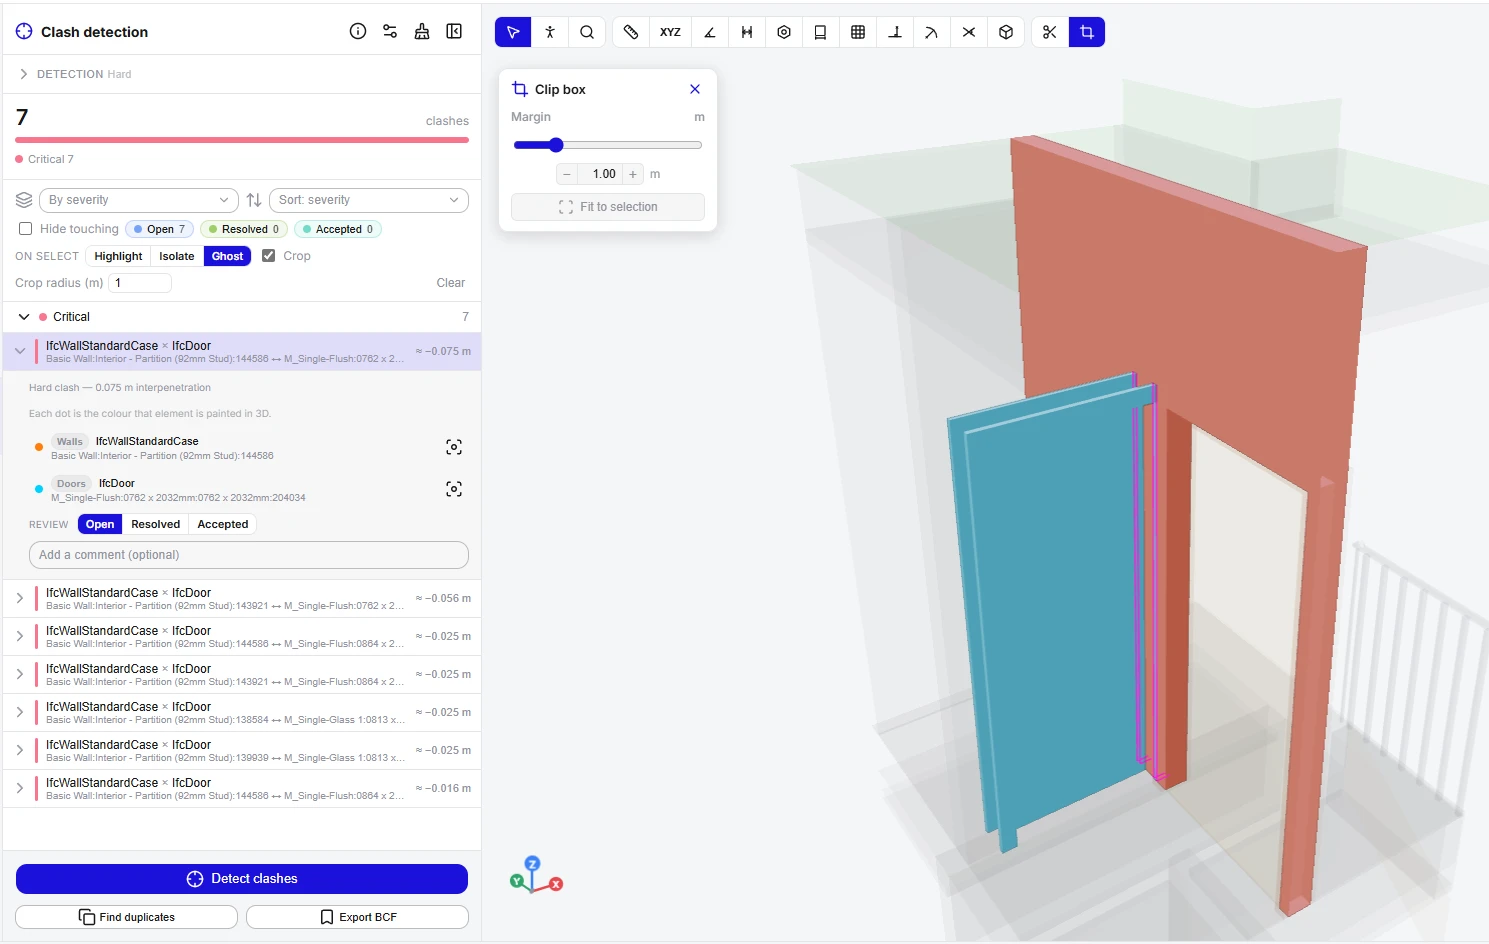
14. Section & clip box

Cut through the model with a section plane, or isolate a cube around the selection with the clip box.

Section plane
Cut Down (plan), Front or Side (elevation).
Position / Flip
Slide the plane, or flip which side is kept.
Clip box
Isolate a cube around the selected element.
Margin / Fit to selection
Grow the cube, or re-fit it to the current selection.
Turn off
Remove the section plane or the clip box.
Back to contents

15. Measure

Enable Measure in the top bar first. Then pick a tool and click points in the model – snapping locks onto vertices, edges and centres.
Distance
Click points; right-click or Enter to finish, Esc to clear.
X/Y/Z
A diagonal plus its three axis legs (2 points).
Angle
Three points A-V-B, with the vertex in the middle.
Plane to plane
Perpendicular distance between two parallel faces.
Face perimeter
Click a face to dimension all of its sides.
To grid axis / To a line
Distance from a point to a grid line or a model edge.
Arc radius
Click three points on an arc.
Angle between lines
Click two model edges.
Bolt / hole
Dimension bolts or openings against a face.
Clear measurements
Remove all dimensions.
Back to contents

16. Saved views (BCF)

bcf.webp

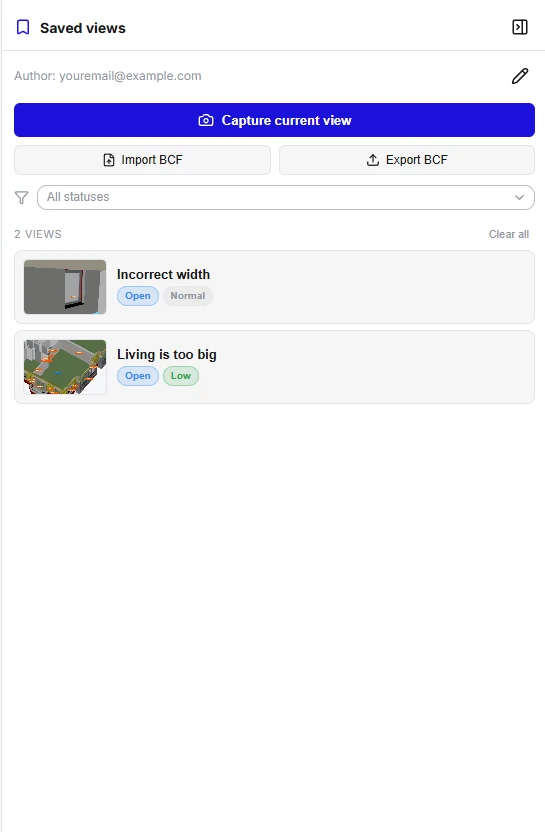
Capture the current camera, selection, visibility and section as a reusable view. Views carry BCF fields and comments and round-trip through .bcfzip files, so they open in any BCF tool.
Capture current view
Save the camera, visibility, section and selection.
Restore
Jump back to a saved view.
Fields
Status, priority, assignee, due date and labels.
Comments
Discuss a view with your team.
Export / Import BCF
Share views as a .bcfzip, or import from any BCF tool.
Back to contents

17. IDS validation & authoring

ids.webp

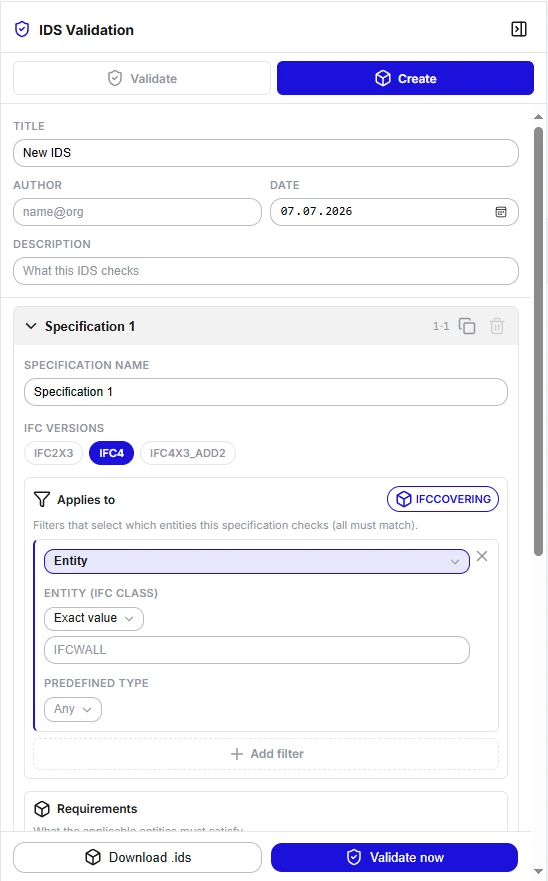
Check a model against a buildingSMART IDS, or author an IDS from scratch. Results show a pass rate per specification and can colour the model green/red or export as a report or BCF.
Import IDS
Load an .ids / .xml file to validate against.
Validate
Run the checks; unsaved edits are included as they would be saved.
Summary
Pass rate with per-specification and per-entity results; filter passed or failed.
Colorize 3D
Green pass / red fail on the model.
Export report
Save the results, or export failing entities as BCF.
Create mode
Author specifications – applicability filters and requirements (entity, attribute, property, classification, material, part-of) – then download the .ids.
Back to contents

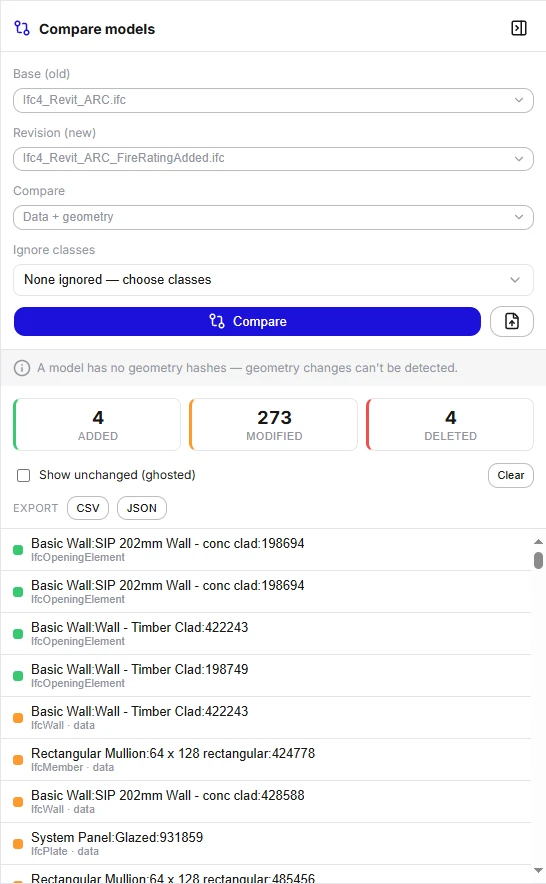
18. Compare revisions

compare.webp

Load two versions of a model and see what changed between them – added, modified and deleted elements, in data, geometry, or both. Open it from the Compare tab.
Load a revision
Add a second IFC (Add IFC) – the new revision to compare against the base.
Base & Revision
Choose which model is the Base (old) and which is the Revision (new).
Scope
Compare Data + geometry, Data only, or Geometry only.
Ignore classes
Exclude chosen IFC classes from the comparison.
Compare
Run it – elements are matched by GlobalId and diffed; geometry changes use shape hashes.
Results
Added, Modified and Deleted counts – click one to filter the list and colour the model.
Show unchanged
Ghost the unchanged elements for context.
Export
Export the change list.
Back to contents

19. Ask AI

ai.webp

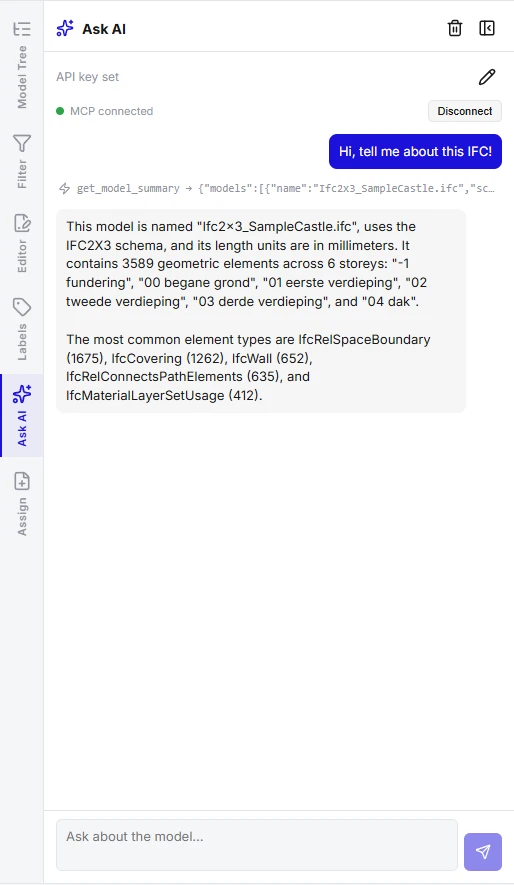
Drive the viewer in plain language – hide, isolate or colour elements just by asking. It runs on Gemini with your own API key, or connects to Claude over MCP to control this tab.
API key
Paste your Gemini key – it is kept only in your browser.
Ask
For example: “Hide all doors”, “Isolate the walls on Level 2”, “Colorize by storey”.
Connect to MCP
Expose this tab as a remote connector so Claude can drive it.
Back to contents

20. Location & georeferencing

location.webp

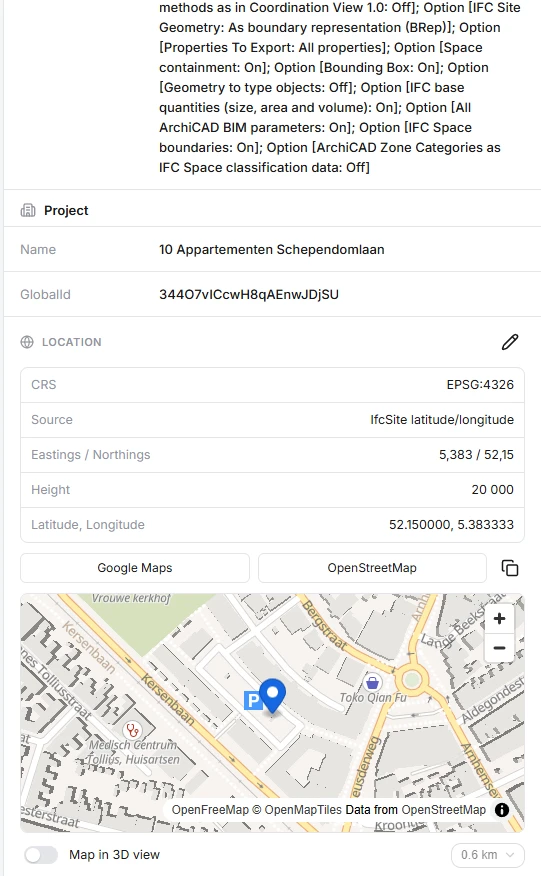
Read and edit the model’s real-world position – CRS, eastings/northings, height and angle to grid north – and pull the surrounding map into the 3D scene.
Read position
CRS, E/N, height, angle to grid north and the resolved latitude/longitude.
Edit geo position
Set the CRS, type coordinates, or click the map / drag the pin to place the model; search an address to fly there.
Georeference from scratch
An empty CRS gets its UTM zone automatically from the picked point.
Map in 3D view
Load the surrounding roads, water, greenery and buildings as geometry, within a chosen radius.
Reset to file
Revert edits to the file’s original georeferencing.
Back to contents

21. Export (IFC / GLB)

export.webp

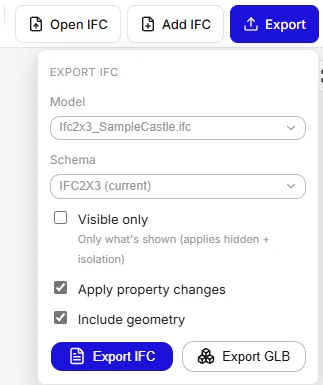
Save the scene – including your edits – back to IFC, or to GLB for other 3D tools. Federated models can be merged with fine control over how sites, buildings and storeys combine.

Scope
Merged (all models) or a single model.
Schema
The IFC schema to write.
Visible only
Export just what is shown (respects hidden elements and isolation).
Apply property changes / Include geometry
Choose what gets written out.
Merge options
How sites, buildings and storeys combine – auto, by name or by elevation; and delete empty containers.
Export IFC / Export GLB
Write the file.
Back to contents

22. Detail level

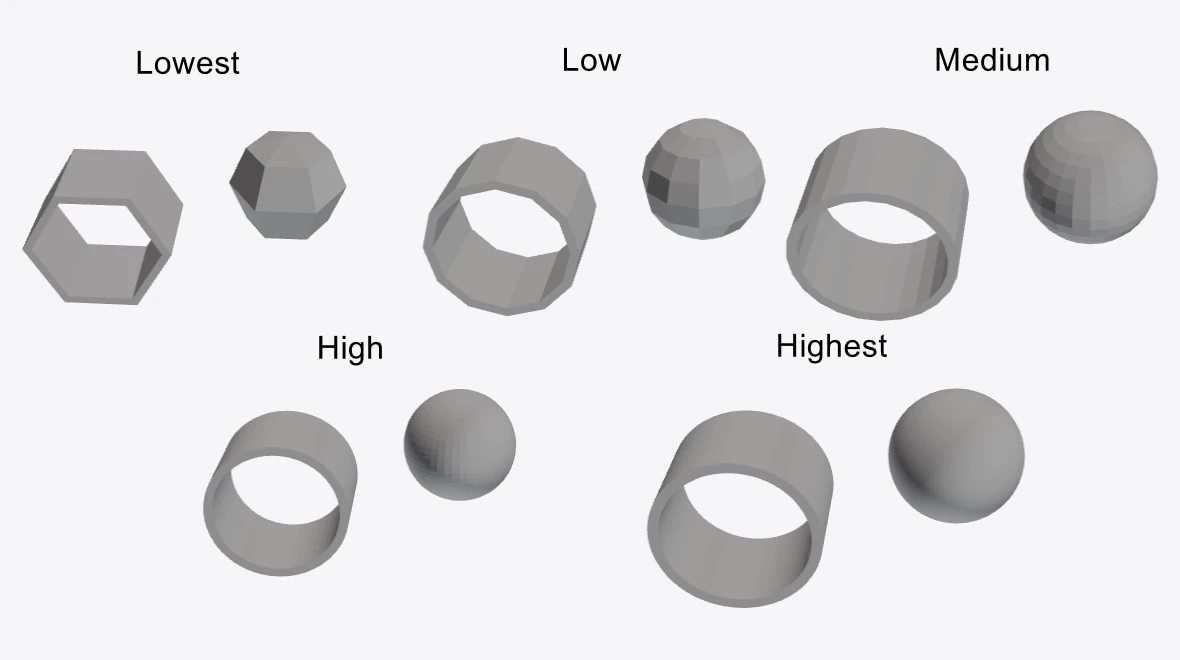
The Detail selector in the status bar controls how finely curved shapes – pipes, bolts, round columns – are tessellated. Raising it makes curves smoother but heavier; lowering it makes very large models open and run faster. Changing it reprocesses the geometry in place from the original file.
detail.webp
Lowest / Low
Fewest triangles – best for very large or federated models, or a weaker machine.
Medium
The balanced default.
High / Highest
Smoothest curves for close-up work and presentation; heavier on memory and slower to export.
When to change it
Lower it if the viewer feels sluggish or an export fails on a huge model; raise it for clean curves on a smaller one.
Back to contents